
Sushi, or Not Sushi: Specialty Rolls You Can Make at Home
/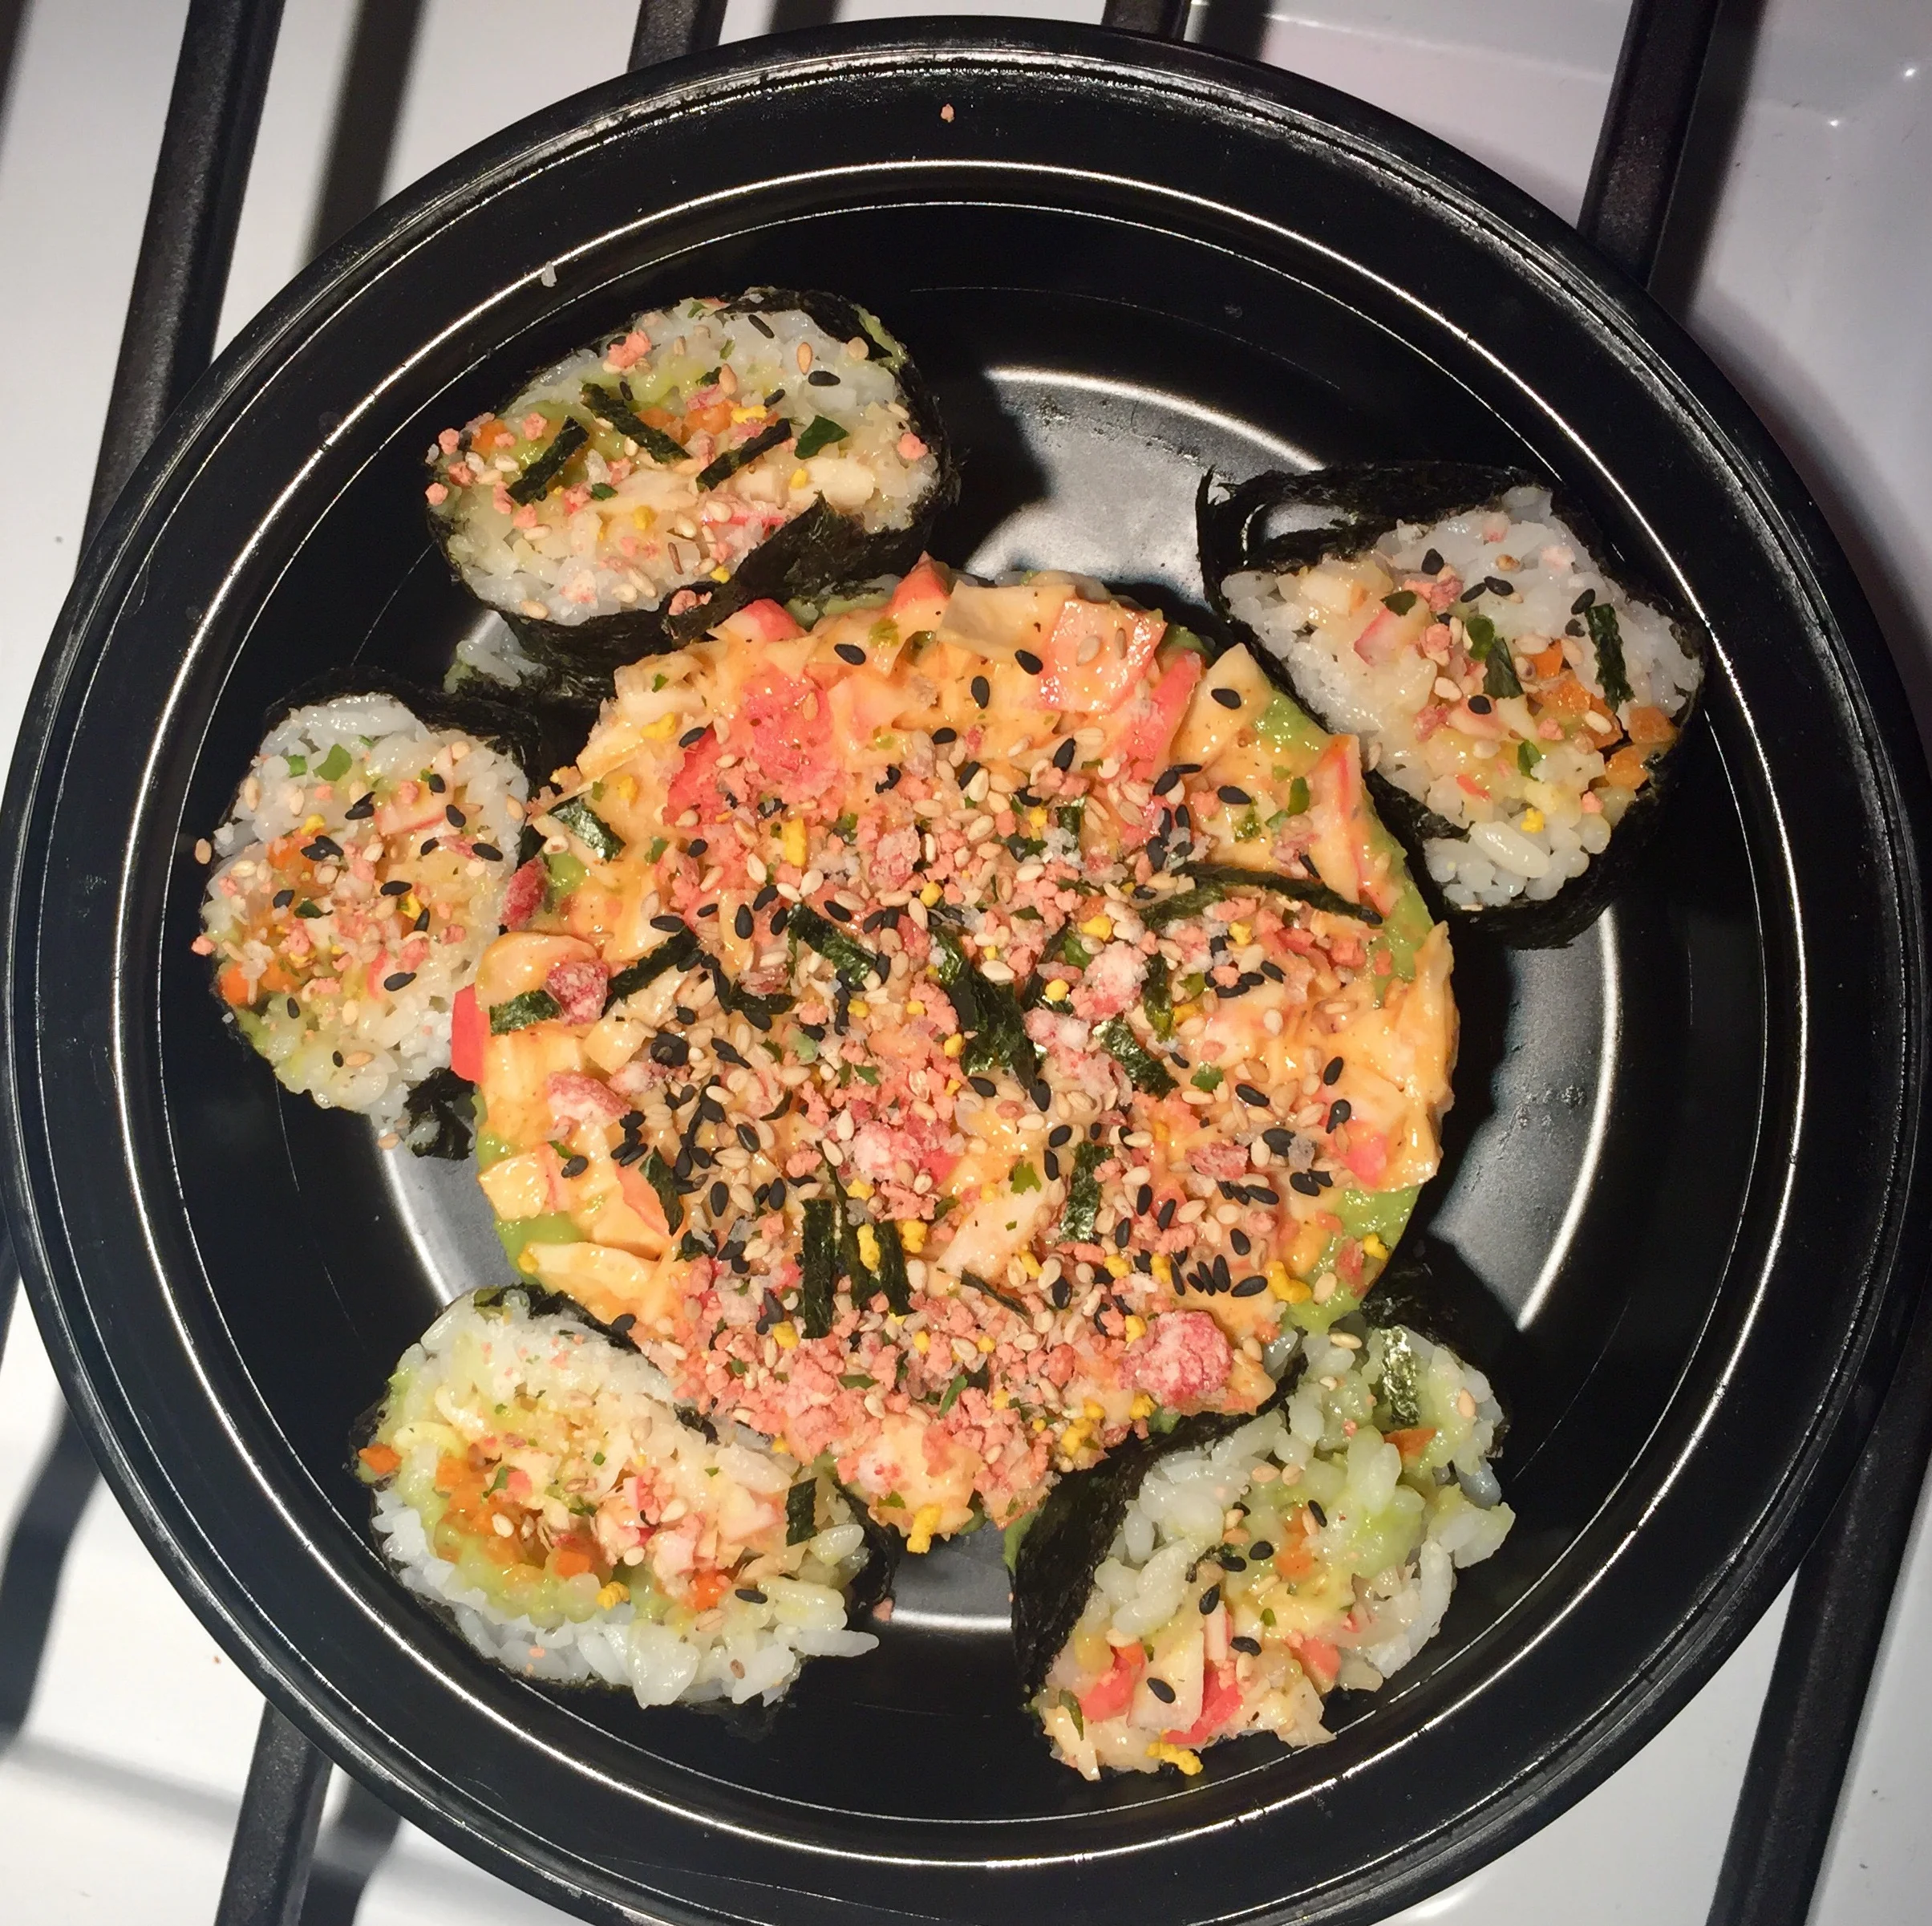
Sushi Bazooka (finished)
I remember the days when I thought I was a fan of sushi because I was getting California rolls from the local supermarket during lunch in high school. I thought I was so cool showing off my chopstick skills on the bench out front. Then my sister insisted we get “real sushi.” Since that day, I have not been able to even think about supermarket sushi again.
My sister and I made getting sushi a frequent thing that we did together. Every few weekends we would try another sushi place and try a few different rolls. When you’re living at home with mom and dad and don’t have to worry about bills or rent, this is a totally fine outing to have as often as you like. When you’re living in your own apartment and you’re trying to afford rent, electric bills, groceries, cat food, and a metro card, sushi is no longer something you can do as often as you please.
I often try and get the “Wimpy Rolls”, as I like to call them, which are the most basic rolls. Cream cheese and salmon. Avocado and shrimp. Spicy tuna. Those are usually between $4-6 each. The problem is that I can easily eat four of those rolls making my dinner cost approximately $20. Let’s get real, though….if I’m ordering sushi, I’m going for some wild rolls. I can’t live off of just cream cheese and salmon when I know what else is out there!
The sushi rolls that are “Specialty Rolls” are filled with a variety of things like eel, salmon, spicy tuna, crunch, mango, avocado, and some sort of crazy sauce all at once. I totally just made that roll up, but I’m sure it’s considered a specialty roll with some whacky name somewhere. Rolls like this cost $12-16, sometimes even more. If I get three of those, I’m easily spending about $40-$50. I don’t know about you, but I have bills to pay and can’t afford to be spending $50 every time I want sushi (which is always).
One of the best things that has ever happened to me (in sushi terms) was probably the discovery of All You Can Eat sushi restaurants. For the low price of $20-25, you can eat as much as your heart desires- including fancy rolls, soups, tempura, and other items. If I’m getting sushi, I’m going to one of these places, and you better believe that I’m wearing my best “buffet pants” For those of you that don’t know, they’re any kind of pants that stretch or are loose... for obvious reasons (if you don’t have a pair of buffet pants, you’re missing out).
The other best sushi-related thing that has happened to me was discovering that I can actually make it on my own at a small fraction of the cost. On top of that, it’s really not that difficult to make. If you go to any Asian market or grocery store, you can find a variety of things to try out in your sushi.
Believe it or not, I do a lot of my grocery shopping at Asian supermarkets. Their produce tends to be really cheap and fresh and they have a million ingredients I’ve never heard of that you can experiment with. They also have some really interesting gadgets for cooking. I bought an onigiri mold at one of these stores. Since then, I have also invested in a sushi bazooka- partially because of the awesome name- and a metal plating ring. I used each of these to create three different meals using the same exact ingredients. The only differences are the styles of the presentations and the skill levels for preparation.
Before we get to how to make these meals, you’ll need to prep all of the ingredients. If you don’t like imitation crabmeat, you can easily substitute canned tuna (I do this one a lot!), shrimp, or shredded chicken in its place. If you’re feeling adventurous, I’ve also bought frozen Ahi tuna steaks from Trader Joe's and used it to make a simple ceviche for a filling.
I recommend starting with things like crab, shrimp, and chicken since they’re all cooked and you know they won’t make you sick. The ceviche, on the other hand, is always a gamble. I haven’t gotten sick from it yet and I love to make it, but each time I have it I spend a few hours wondering if I gave myself food poisoning. I can’t help it! Consuming raw or undercooked meat can make you sick (there’s your PSA), so start simple! You can really put almost anything in each of these dishes, but this is my go-to recipe that I created based on trial and error:
Ingredients
Sushi rice
Water
Rice vinegar
Salt, Pepper
Imitation crab (or other substitute)
Low-fat mayonnaise
Sriracha
Sesame Oil
Seaweed sheets
Additional (optional) Ingredients
Sesame Seeds
Furikake (any variety)
Cilantro
Matchstick carrots or other veggies
Rice
Rinse 3/4 cup dry sushi rice. Bring the rice and 1 cup of water to a gentle boil. Turn the heat to low, add a small splash of rice vinegar and salt. Continue to simmer with a cover on for about 15-20 minutes or until all of the water is absorbed. Many people also add some sugar to their sushi rice, but I tend to skip it. Let it cool a bit before using.
Crab Mixture
Roughly chop imitation crabmeat to make 1 cup. Mix it together with 1 tbsp low-fat mayonnaise, 1 tbsp sriracha (or less if you don’t like it as spicy), 1 tsp sesame oil, and a little salt and pepper. This is your filling for all of the meals!
Sabra Guacamole
Unwrap it. Avocados weren’t ripe at my supermarket so I grabbed this for the same price of one avocado. It get’s the job done! If you’re using an avocado, which is preferable, now is the time to dice it or slice it any way you like!
Seaweed
Dip the sheet you’re using for sushi in water just before using. Cut a strip that’s an inch wide from another sheet for each onigiri and dip in water.
Furikake
Furikake, for those of you that don’t know, is a Japanese rice seasoning. It comes in a wide variety of flavors. I bought mine, Ebi Fumi Furikake, because I liked the color. It has this nice soft pink color with little specks of yellow mixed in. It also has little tiny pieces of green seaweed.
I had no idea what it would taste like, but I did take a look at the ingredients first. In this one there are sesame seeds, shrimp, potato starch, seaweed, sugar, salt, and dried yolk powder. It doesn’t sound that appetizing, but when you sprinkle it on the rice, it makes all the difference. It enhances the overall flavor of your dish, but also adds a slightly crunchy element to it. Let’s not forget how pretty it makes your meal!
This should only go on right before serving, otherwise, it gets soggy. It comes in all different flavors and colors and for the most part, they all have Japanese names, so make sure you read the ingredients to figure out exactly what it is you’re buying! This is my favorite topping and I highly recommend using it, even if it’s just for appearance.
Onigiri
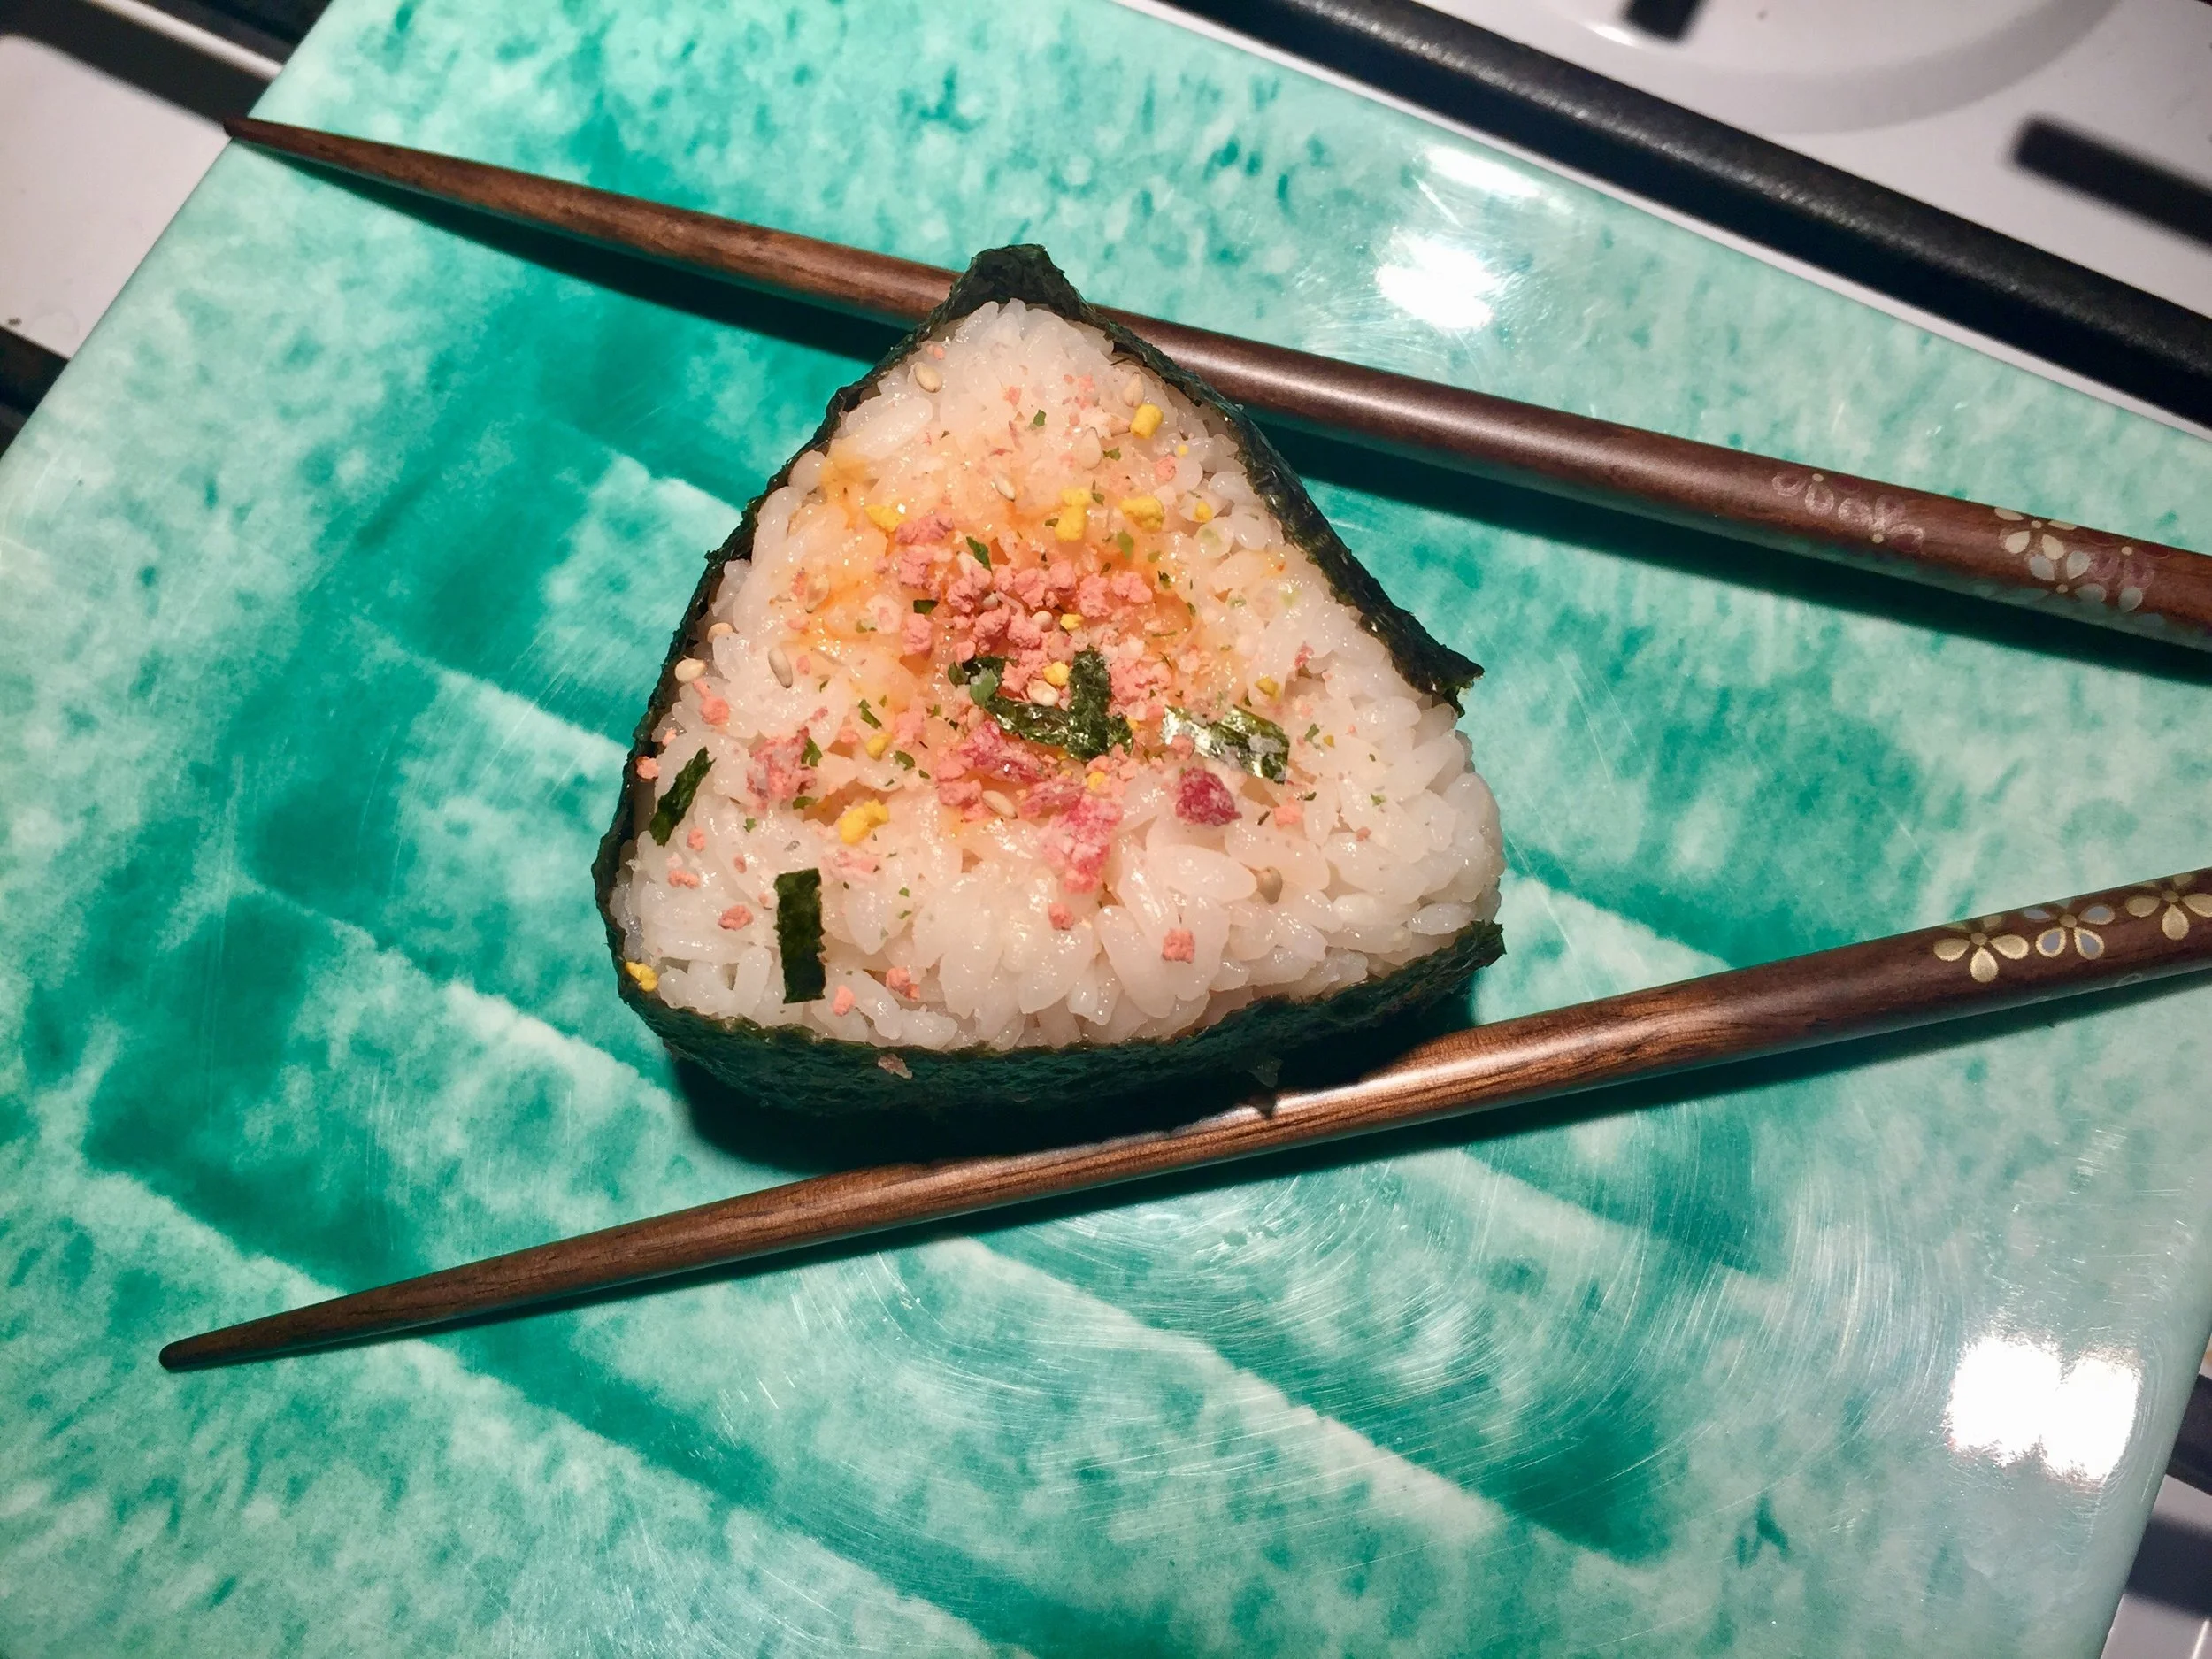
Onigiri
Onigiri is basically a Japanese rice ball that is stuffed with something super tasty. I’ve bought it filled with spicy tuna before, but they also sold it stuffed with kimchi, crab with Japanese mayo, grilled roast beef, or pickled plum. I’ve seen posts about stuffing it with your favorite sandwich ingredients like ham and cheese…the possibilities are endless! These are probably the easiest method to get your sushi fix in!
Once you have all of your ingredients prepared:
1) Fill the mold halfway with rice and make a little well in the middle.
2) Stuff it (it only fits a little bit!).
3) Cover the rest of the way with rice.
4) Put the cover on and press down to compress.
5) Pop the rice ball out by pushing on the back triangle.
6) Cut seaweed into a strip about an inch big and quickly dip in water. Wrap it around the onigiri.
7) Sprinkle with whatever toppings you like- I use Furikake and sesame seeds.
*This recipe used a little less than 1/2 cup cooked sushi rice, a very small amount of the crab mixture and guacamole, an inch strip of seaweed, and some sesame seeds and furikake. This was for each onigiri. If you don’t have an onigiri mold, you can easily make these by forming them in cling wrap. I usually see them in a sort of triangular shape as opposed to a sphere, but I think either would be acceptable.
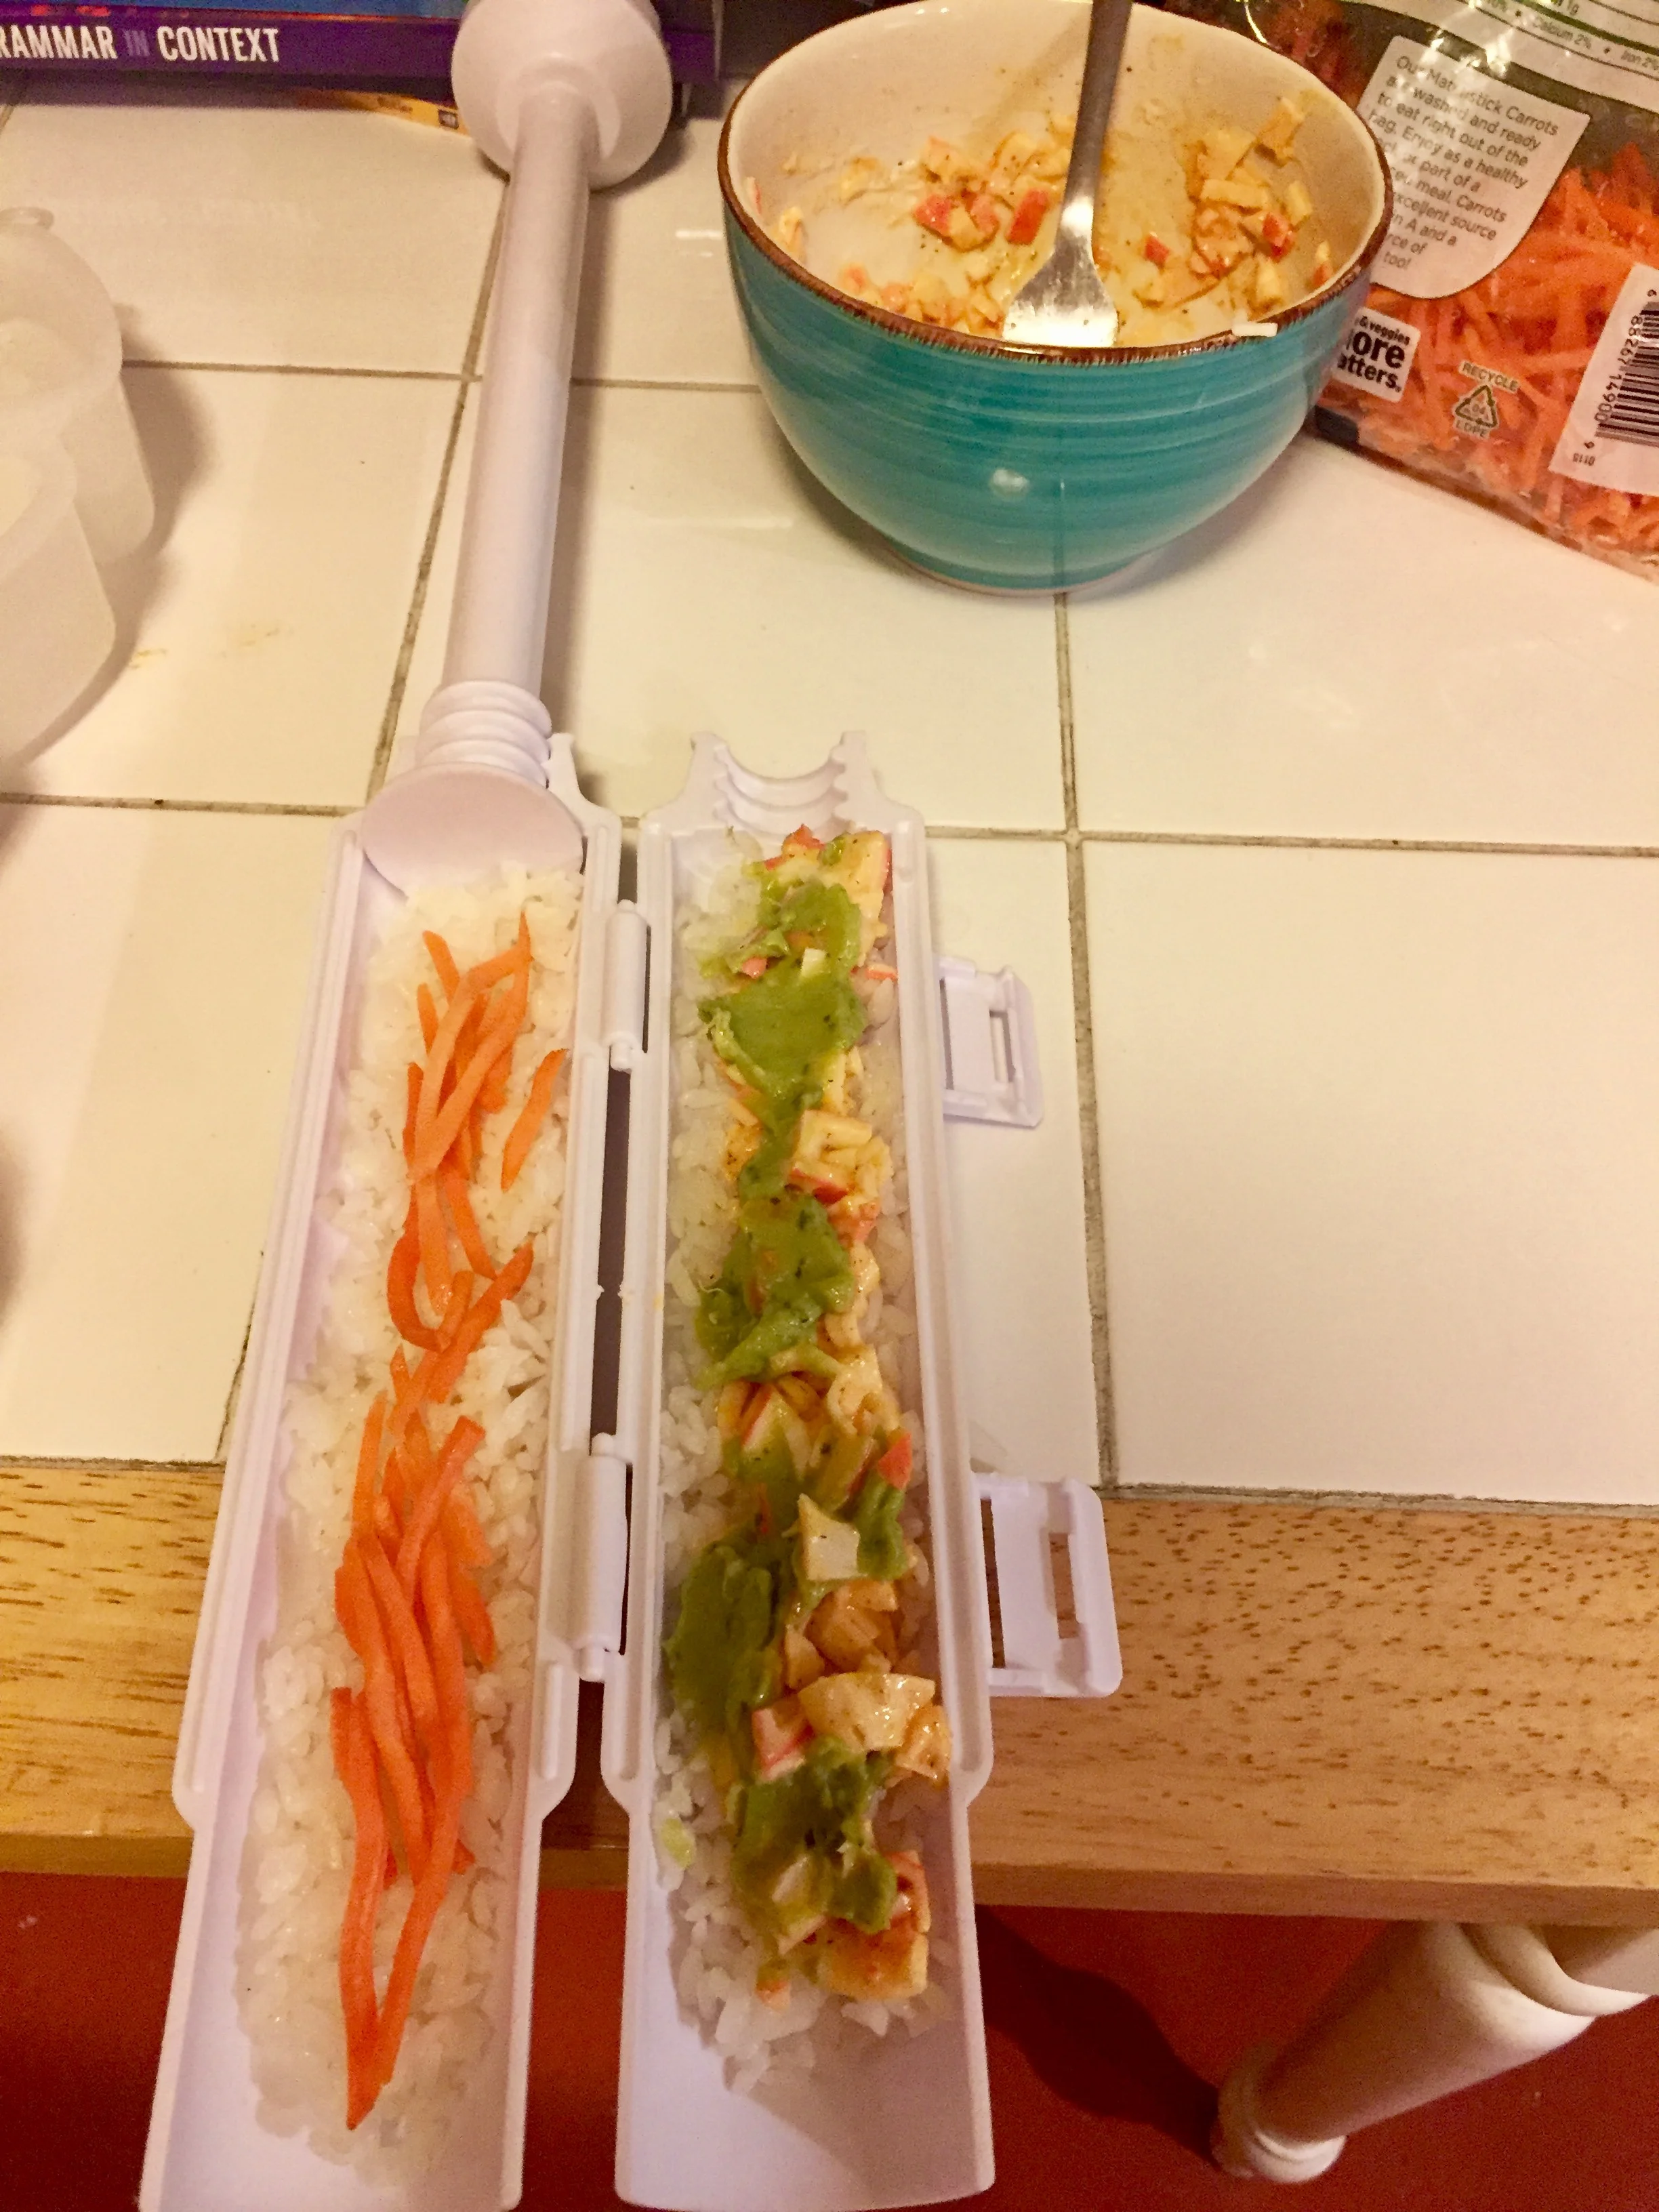
Sushi Bazooka
I admit, I saw a video ad for the Sushi Bazooka while scrolling on my newsfeed and ended up immediately going to buy the product on Amazon. The Sushi Bazooka was something I just had to have! I’ve tried making sushi before and was very unsuccessful. I also had a sushi mold (similar to my onigiri mold), but it was so small that I felt like it was hard to stuff with things.
The Sushi Bazooka was easy to fill with ingredients and made the process of making sushi very simple. The hardest part of this process was cutting the roll into pieces. My seaweed paper directions don’t tell you to wet it before using it, so I tried using the dry seaweed to wrap my beautiful rice roll. It rolled fine, but I could tell something wasn’t right. When I went to cut it, I had a lot of difficulty. The rice squished out the sides and the seaweed wanted to be stubborn and do its own thing. I felt like maybe my sushi would have been better as a “sushi burrito” at that point.
Now I know now that I most definitely should have wet the seaweed beforehand. Knowing this, you can make the perfect sushi when you try it at home! By the way, the directions for the Sushi Bazooka may not be in English. In fact, I couldn’t even tell you what language they were in, so I figured this out based on pictures and was pretty successful:
Sushi Bazooka
1) Open the bazooka and take out the piece in the center.
2) Fill both halves of the bazooka with rice (don’t fill it so much that you won’t be able to fit any fillings, though!)
3) Put your fillings in. Remember, you can use both halves to put ingredients in.
4) Put the piece from the center back in, with the screw part lining up in the end space provided. The long handle part of the piece should be sticking out, not on top of your rice. You’re going to use this to push out your roll!
5) Slam your bazooka shut and lock into place.
6) Get your wet seaweed ready on a clean, flat surface. Crank the handle until you can start to push your sushi out of the end. Push it directly onto the seaweed.
7) Roll up your sushi! Since your seaweed is wet, the end should stick to the roll.
8) Cut it into 6 pieces using a sharp knife. Sprinkle with desired toppings. At this point you can also just eat it like a burrito if you don’t want to risk messing it up by cutting it!
*This recipe used about 1/2 cup rice, 1/4 cup crab mixture, 1 tbsp Sabra guacamole, a few matchstick carrots, one piece of seaweed, and a sprinkle of sesame seeds and furikake.
Sushi Cake
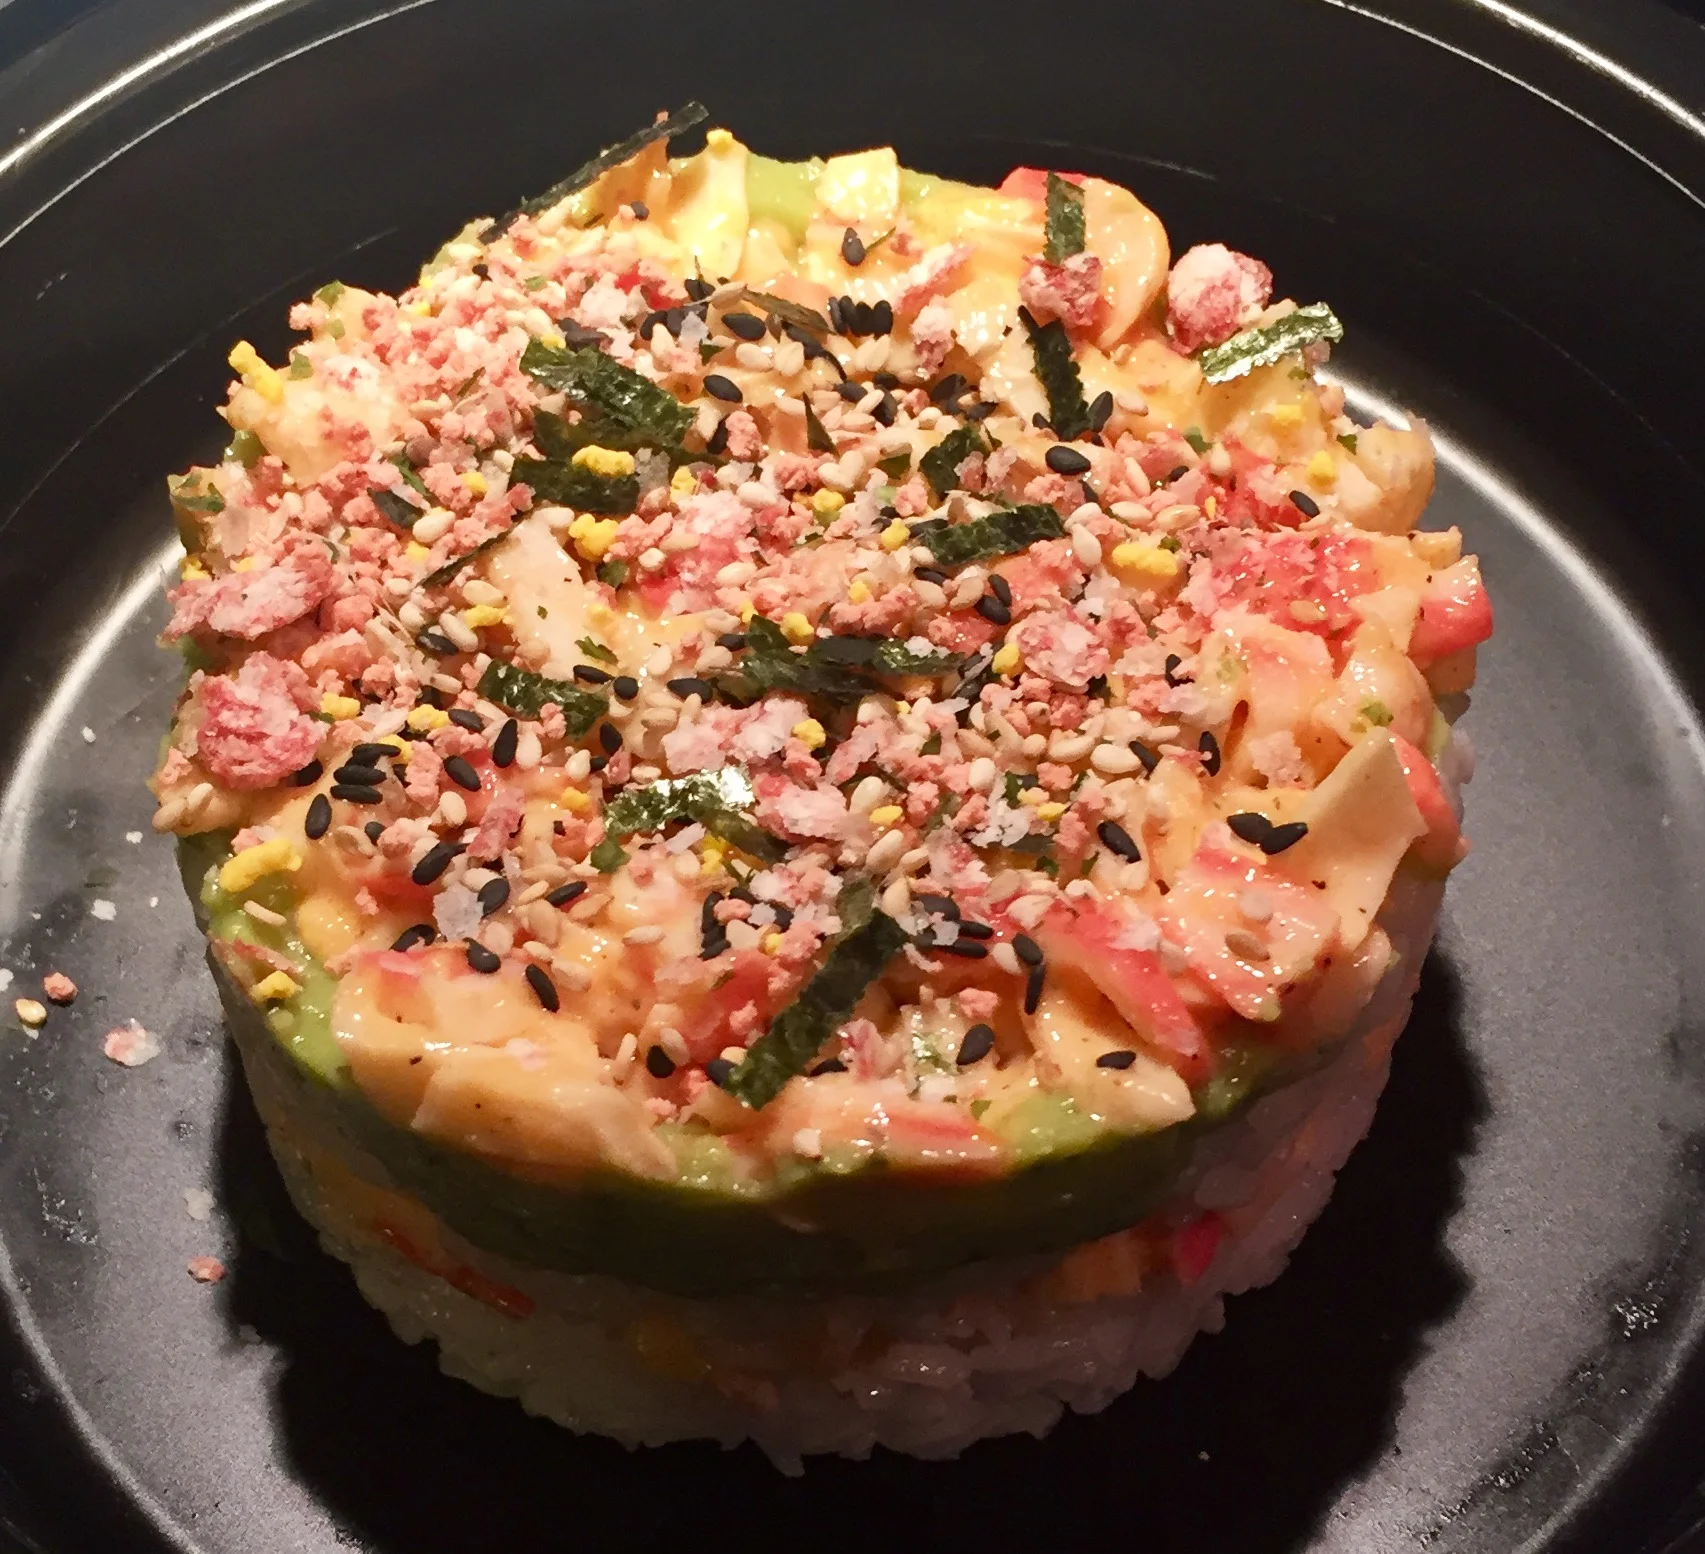
Sushi Cake
This is one of the most beautiful things I know how to make. When I have a bad day and want to make something to cheer me up, this is what I go for. There’s something about the appearance of this meal that makes you feel like it’s a really special treat. It’s sure to impress the pants off of anybody you make it for!
This is just as easy as the onigiri. To make a sushi cake, I use a metal plating ring that I bought for under $10 on Amazon. If you don’t have one of these rings, you can make your cake in a ramekin or small bowl. You can even use this concept of layers to make a loose type of sushi salad in a bowl.
1) Put the ring on the plate you plan to serve/eat from.
2) Put a layer of rice (mine was about 1/4 cup) followed by a layer of the crab mixture. Add another layer of rice, then avocado/guacamole, and then more crab.
3) Put your toppings. Furikake, sesame seeds, and cilantro all make great toppings!
*This recipe used about 1/2 cooked sushi rice, 1/2 cup of the crab mixture, 1 tbsp Sabra guacamole, and a sprinkle of sesame seeds and furikake.
I love making Asian style meals and am pretty sure I was from Asia in my past life, so I had most of these ingredients lying around my apartment. When I would normally be spending between $20-40 on sushi, I made two meals and a snack for a couple bucks. The only things I had to buy this time around were the guacamole and the crab for a total of $4. Everything else was leftover from the previous times I made these.
This recipe used all of the rice that was cooked and made one sushi roll (6 pieces), one sushi cake, and one onigiri. Not bad for 3/4 cup of dried rice! I had some of the crab filling left over to enjoy on the spot and a ton of guacamole to enjoy for a snack tomorrow. All of the other ingredients are things that you can use over and over again. Once you have these strange items like furikake and seaweed in your cabinet, you’re always ready to make some form of sushi and save yourself some serious money!
Share your comments at the bottom of the page.

© Copyright Whatismyhealth, March 5th, 2017